As many of us will have been reading about and hearing about in the news, online and in our feeds. Due to the situation in eastern Europe at the minute, many governments and their agencies are warning of an increase in both phishing and hacking at this time. In response to these evolving threats, organizations are increasingly turning to risk-based access strategies to better protect their systems and data.
There are a number of measures you can employ to counter these, such as
- Enable MFA
- Keeping systems updated (Patching)
- Using complex passwords (a password manager can help)
- Staff Training (this is possibly your weakest point)
- Enable phishing and email protection
One of the ways that help, if you have Microsoft (Azure), is by using Conditional Access to block user logins by geographic location. Access to company resources can be managed at the account level using Microsoft Entra ID, allowing organizations to enforce policies that restrict access based on location or other conditions. Blocking access from certain countries can also help organizations meet compliance requirements imposed by industry regulations or government mandates. This can add an extra layer of security to your Microsoft environment in the event one of your staff’s passwords become compromised.
Below we will outline a process using Microsoft Azure Active Directory and Active Directory Conditional Access that I have deployed to block access based on geographical location.
Introduction to Microsoft Entra
Microsoft Entra is a comprehensive identity and access management solution designed to help organizations protect their digital assets and data. With Microsoft Entra, you gain a powerful set of tools to manage access to cloud apps, systems, and resources, all while maintaining robust security and compliance. One of the standout features of Microsoft Entra is Conditional Access, which empowers organizations to create Conditional Access policies that control how, when, and from where users can access target resources.
Conditional Access policies in Microsoft Entra allow you to block access from certain countries or regions, limit access to specific locations, and require multi-factor authentication (MFA) for users accessing resources from outside your organization’s trusted network. By leveraging these access controls, you can ensure that only authorized users and devices are able to connect to your cloud apps and sensitive data, reducing the risk of unauthorized access and potential data breaches.
At the heart of Microsoft Entra is Entra ID (formerly known as Azure AD), which serves as the unified identity management platform for your organization. With Entra ID, administrators can create and manage user accounts, groups, and access controls, including the ability to define named locations. Named locations are a key feature that lets you specify countries, regions, or even specific IP addresses from which access is allowed or blocked. This is especially useful for organizations that need to comply with data sovereignty regulations or want to restrict access to resources based on geographic location.
Creating a Conditional Access policy in Microsoft Entra is straightforward. Administrators can navigate to the Microsoft Entra portal, select the Protection tab, and access the Conditional Access section. From there, you can create a new policy, define the conditions under which access is granted or blocked, and assign the policy to specific users, groups, or devices. For example, you can block access from certain countries, require multi-factor authentication for users connecting from outside your network, or limit access to specific cloud apps and resources.
Microsoft Entra also provides flexibility through the Exclude tab, allowing you to exclude specific users or groups—such as break-glass accounts or emergency access accounts—from Conditional Access policies. This ensures that critical accounts always retain access, even if a policy would otherwise block them. Additional features like IP fencing let you restrict access to specific IP addresses or ranges, while VPN controls enable you to manage access based on VPN connections, further enhancing your organization’s security posture.
By implementing Microsoft Entra and its Conditional Access policies, organizations can effectively block access from certain countries, limit access to specific locations, and require multi-factor authentication for users accessing resources from outside the trusted network. These capabilities help protect against unauthorized access, support compliance with regulatory requirements, and provide peace of mind that your digital assets and data are secure. With its robust set of features, Microsoft Entra is an essential solution for any organization looking to manage access and identity in today’s cloud-first world.
What is Conditional Access Location Blocking?
Conditional Access blocking based on location is where you can block a user from accessing your systems if they are attempting to log in from a country that they either do not have permission to be in or should not be in. It is also used to stop access and traffic from countries where you do not have users, or it is unusual for you to have users working from. Blocking countries can be achieved by configuring network location policies to create blocks for specific countries, including European countries if needed.
An example would be that you are positive that nobody in your organisation should be attempting to log in from Antarctica (yes, an actual location option) to access their emails, share point or even Teams. Then once you have established that this is not one of your users, you can block these locations. Organizations may also choose to block access from specific countries or regions, such as European countries, depending on their security requirements.
Another use that we have used is to block countries where we are getting large numbers of failed logins from that we are sure are malicious attempts.
You should note that if the locations are defined by IP Address, a VPN could bypass this rule. You can select GPS via the Microsoft Authenticator app (more info here)
How To See Your Login Locations
It is a good idea to first see what locations your organisation has been accessed, or attempted to be accessed, from over a set period of time. This is an especially useful task to carry out in conjunction with your HR/People Team in light of recent events.
We carry this out via Microsoft Sentinel on a weekly and monthly occurrence for a number of reasons, including Failed login attempts over a prolonged period and also it can help find configuration issues with servers etc. Monitoring sign-ins and analyzing signals such as sign-in location and device trustworthiness can help identify suspicious activity and improve access security.
You can easily check both successful and unsuccessful logins by using one of the inbuilt queries in Microsoft Sentinel (SignIn Locations). Audit logs can also be reviewed to provide a detailed record of access attempts and support security investigations. You can adapt this to pull out the users or user display names. These reports can also be filtered by tenant to focus on specific organizational units.
This can be found in Sentinel > Logs > Queries > Signin Locations
You can use the search bar as I have to speed this up.
You will also need the Microsoft Country Codes, which can be found here.
How Do They Know Where Users Are?
Below we will be highlighting how to block users by location based on their IP address. This is where Microsoft will collect their IP address from the device that they are logging in with. Microsoft will then use their database to resolve or match this IP address to a known location or country. Microsoft uses IP ranges assigned to specific countries to determine the geographic location of a sign-in attempt. This is not always an exact science with Microsoft as they are known (in my experience anyway) to not be as accurate as they could be.
You can determine the location of a user by GPS. However, this requires the user to have the Microsoft Authenticator app installed on their mobile device. This will then be used to connect to the system, initially to authenticate the user (done every 24 hours) and then silently each hour to determine the user’s GPS location.
You can find out more here
Create a Named Location
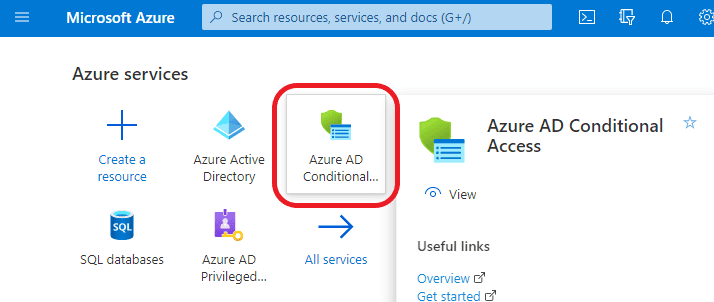
Step 1 – Login to Azure > https://portal.azure.com/#home
Step 2 – Select Azure Active Directory Conditional Access Tab
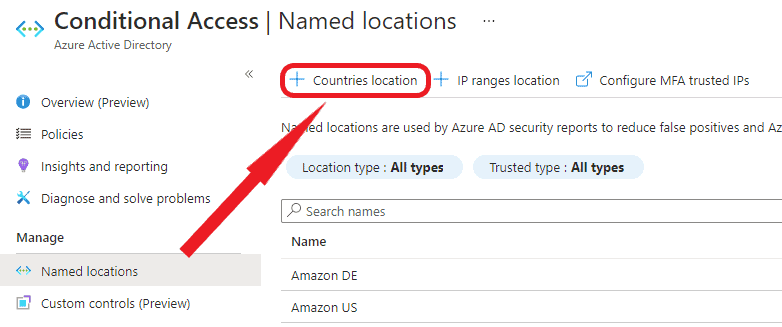
Under Manage Section select Named locations > New Countries Location.
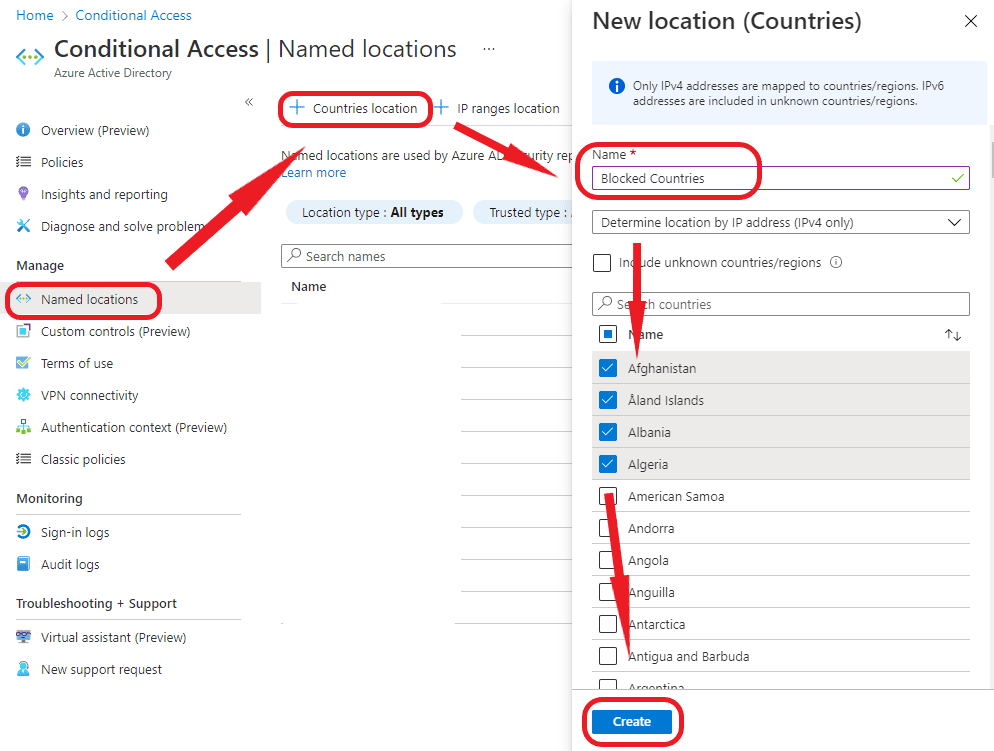
Step 3 – Name your new location Blocked Countries, select Countries/Regions and check any countries you wish to block.
Note: Instead of blocking specific countries, organizations can also use a country whitelist approach (also known as an allow list), where only selected countries are allowed and all others are blocked.
Then Click Create. The named location has now been created and can be used to enforce blocks on access from the selected countries.
Create A Conditional Access Policy
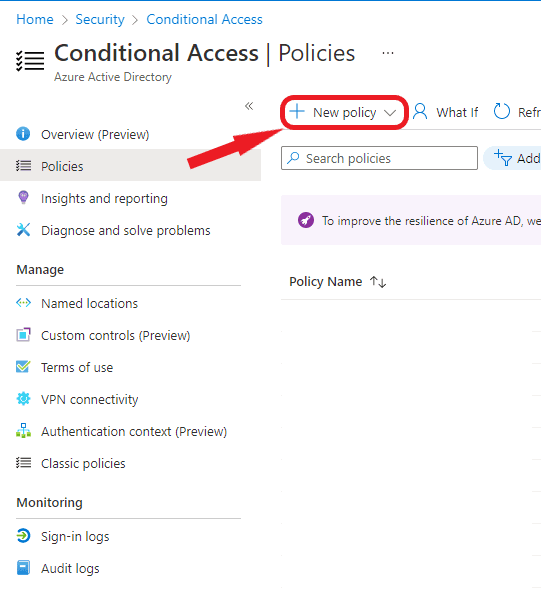
Step 4 – Next go to Policies and select New policy.
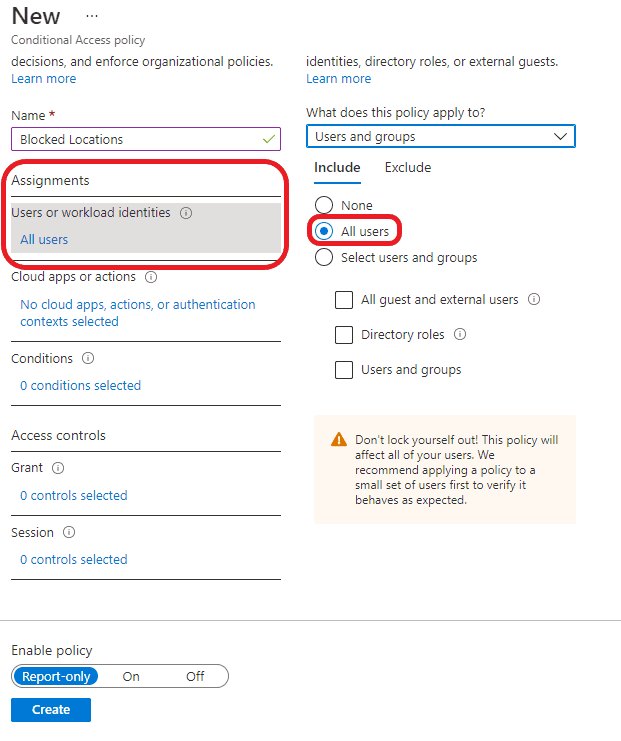
Step 5 – Name the Policy Block Locations.
Step 6 – In Assignments select All users (you can also select specific users or groups if you wish – this may be useful for testing) that you want the policy to be applied to.
After enabling and saving the policy, policy enforcement is triggered, ensuring that access attempts from blocked countries are automatically denied.
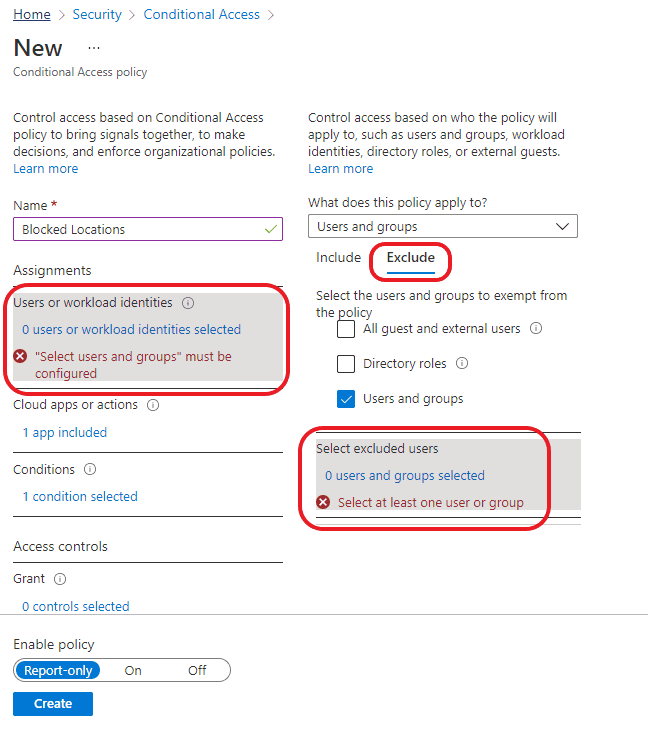
How to Exclude Users or Groups From Conditional Access
For users or certain groups who you do not want to be included in this rule you can select the Exclude tab and enter those users or groups as needed. This process is known as exception management, allowing organizations to maintain flexibility while enforcing security policies. It may be a good idea to exclude yourself and another admin initially.
Step 7 – Select any cloud apps you want the policy to apply to and block access to the apps based on location. The example here uses all the Office 365 apps.

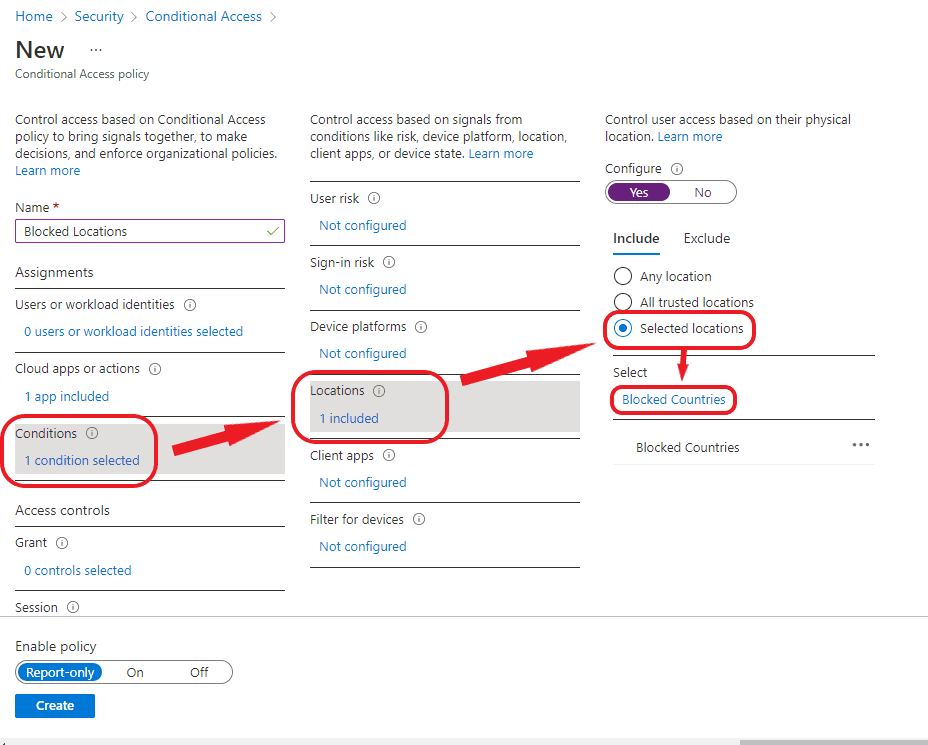
Step 8 – Select Conditions > Locations > Selected locations > Blocked Countries. (or what ever you named it earlier in the process.)
Then click Create
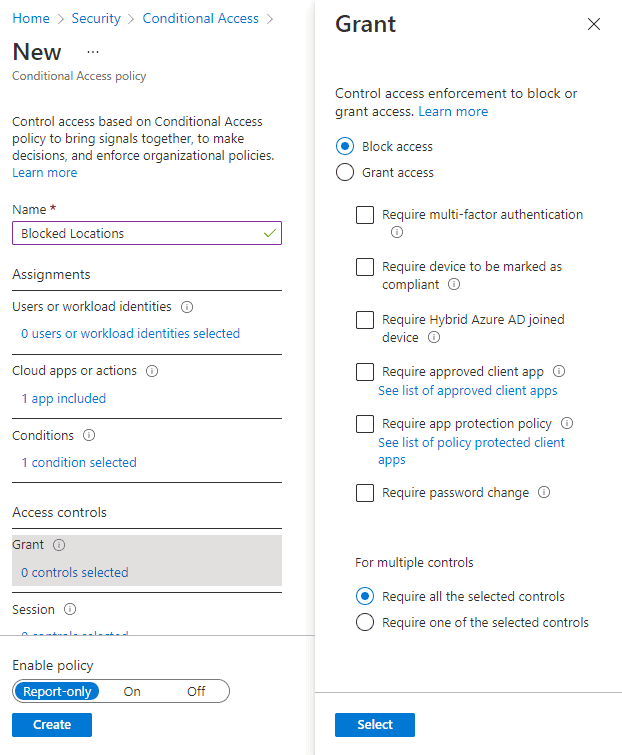
Step 9 – In Access controls select Block Access. Note: this rule can also be modified here to force multi-factor authentication rather than a block
Then click Enable Policy (or Report Only as below) and then Save
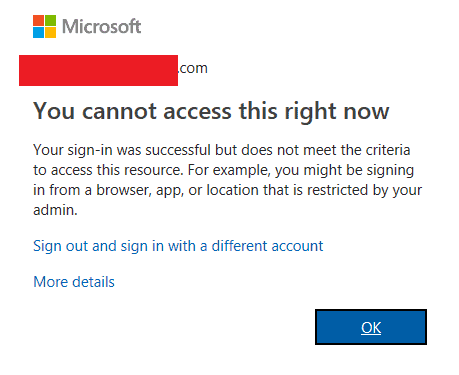
Once you have completed all of the steps and saved your new Conditional Access rule, your users (or anyone who gains access) will see a pop-up and be blocked from going any further.
I can decide if I like the fact that Microsoft has said in the pop up that their login was successful or not, however, this is what they will see
As always I would suggest testing this out on a small number of users in your organisation before pushing it out globally.
Please feel free to leave a comment or let us know if you know of a different way of doing this.
Microsoft SC-900 Exam Guide
Exam Prep Guide SC-900: Microsoft Security, Compliance, and Identity Fundamentals Exam from the number of DMs I got when I posted about passing the SC-900


1 thought on “Blocking Users By Country Using Azure Conditional Access”
Comments are closed.